The Fast & Easy Way to Create City Location Pages in WordPress
What are “city pages”, and why do I need them on my website?
Before we learn how to create city pages, let’s discuss what city pages are and why your website might need them.
The best way to rank in a particular city is by having a physical location and optimizing the corresponding Google Business Profile. But if that’s not possible, that’s where city pages come in.
City pages have content with localized signals, i.e., names, keywords, and information for a city. If your business operates within a particular geographic location, creating pages optimized for cities within that region can increase your website’s visibility and rank in local search results.
You might not go through the trouble of building city pages if your business is national or global, but if you run a local service company, it makes a ton of sense.
How we build city pages
We used to build a city page template, duplicate it, and manually modify the copy for each city, which is an excellent way to go if you have only a handful of pages. But it’s time-consuming and unwieldy when you have upwards of 100-150 cities to optimize for (as some of our clients do).
As is the case for almost everything, there’s a better way to do it.
Our process adds complexity, but done correctly, you can create as many city pages as you want in a matter of hours. In brief, we’ll set up a custom post type and use a plugin to populate those city pages with dynamic and static content versioned by city name.
Tools we use
These are the WordPress plugins and themes that work well for us. If you know of others, please leave your suggestions in the comments below!
Divi
As I’ve mentioned in a previous article, Divi has been a staple in our website build process for several reasons, including performance, ease of use, and the support of the Divi community.
Divi has a thriving community of third-party developers who create excellent plugins that extend the theme’s functionality, one of which is Divi Engine, which makes one of the main plugins we will be using.
Divi Machine
The Divi Machine plugin adds functionality to Divi, including an archive loop module, which we’ll use to display the City posts on our archive template.
WP All Import/Export
We’ll use WP All Import (and possibly Export) to import the custom posts with dynamic content to our site.
Write the content
Before we can start importing posts, we need to write content for them.
- We’ll add city location signals — names and keywords. Copy should sound natural and describe services. Keywords in headings have extra value.
- Copy should be detailed and nicely formatted for the online reader — h2s, bullets, etc.
- We’ll link into the site and main service areas (how pages can help local conversions).
Build the markup
The next step is to take that copy and format it as HTML. If your content is relatively short, you can build the markup during the import process with the WordPress WYSIWYG editor. Or, if you prefer a more interesting layout, you can spend some time styling your markup and even include some Divi shortcodes.
To keep this as straightforward as possible, we’ll stick with basic HTML.
Here is the markup we’ll start with:
<p>Demo Appliance Repair has delivered expert, reliable, affordable appliance repair to Los Angeles, CA, since 1965.</p>

<p>We're proud to be the go-to appliance company for many homes, businesses, and apartment blocks in Los Angeles and nearby cities.</p>

<p>Fanatical customer support, ultra-fast response times, reasonable prices, and a staff of highly experienced, certified technicians have made us the number one air conditioning, heating, refrigeration, and appliance repair company in the Los Angeles area for over a decade.</p>

<ul>
 <li><a href="#">Contact Us</a></li>
 <li><a href="#">Appliance Repair</a></li>
 <li><a href="#">Air Conditioning Repair</a></li>
 <li><a href="#">Heating Repair</a></li>
 <li><a href="#">Our Service Area</a></li>
</ul>

<h2><strong>The Air Conditioner Goes Belly Up in Los Angeles, CA</strong></h2>

<p>When the air conditioner dies in your home or business, chances are it's not the month of December. There's no holiday music playing in the shopping malls of Los Angeles or the lobby of your office complex.</p>

<p>No, it's probably July or August, when a 90-degree peak during the day feels like a reprieve from the 100-plus degree heat.</p>

<p>Welcome to summer in Southern California. Air conditioning, which used to be a luxury, is now a necessity as temperatures climb ever higher. Most people take their AC for granted. Trust us — they shouldn't unless Demo Appliance Repair has recently maintained their AC or HVAC units!</p>

<p>Summer heat places extraordinary demands on your air conditioner. An aging AC appliance or HVAC system may not be able to keep up, like an old car that has lost its pep to climb steep hills.</p>

<p>Parts wear out, especially when they're not well-maintained, and BOOM! — one evening at 10 PM, while the mercury still hovers at 90 degrees and your patio feels like a set from Lawrence of Arabia, the air conditioner quits. You're left to stew and swelter until you call us early the following day. We open at 8 AM, and we're always cheerful! And we cheerfully serve your city, Los Angeles, CA!</p>
Create a “City” custom post type
Our next step is to create our CPT.
We can create the post type using any plugin that assists in creating CPTs or by adding the code yourself. But, in our case, we’ll be using Divi Machine.
After purchasing, installing, and activating Divi Machine, we can create our City CPT. Navigate to the Divi Engine admin menu on the left side and click on the “Add/Edit Post Types” option.
Click the Add New button at the top, and you should see an options page something like this:
(I’ve already created this post type, so my screenshot says “Edit Post Type” rather than “Add New Post Type”)
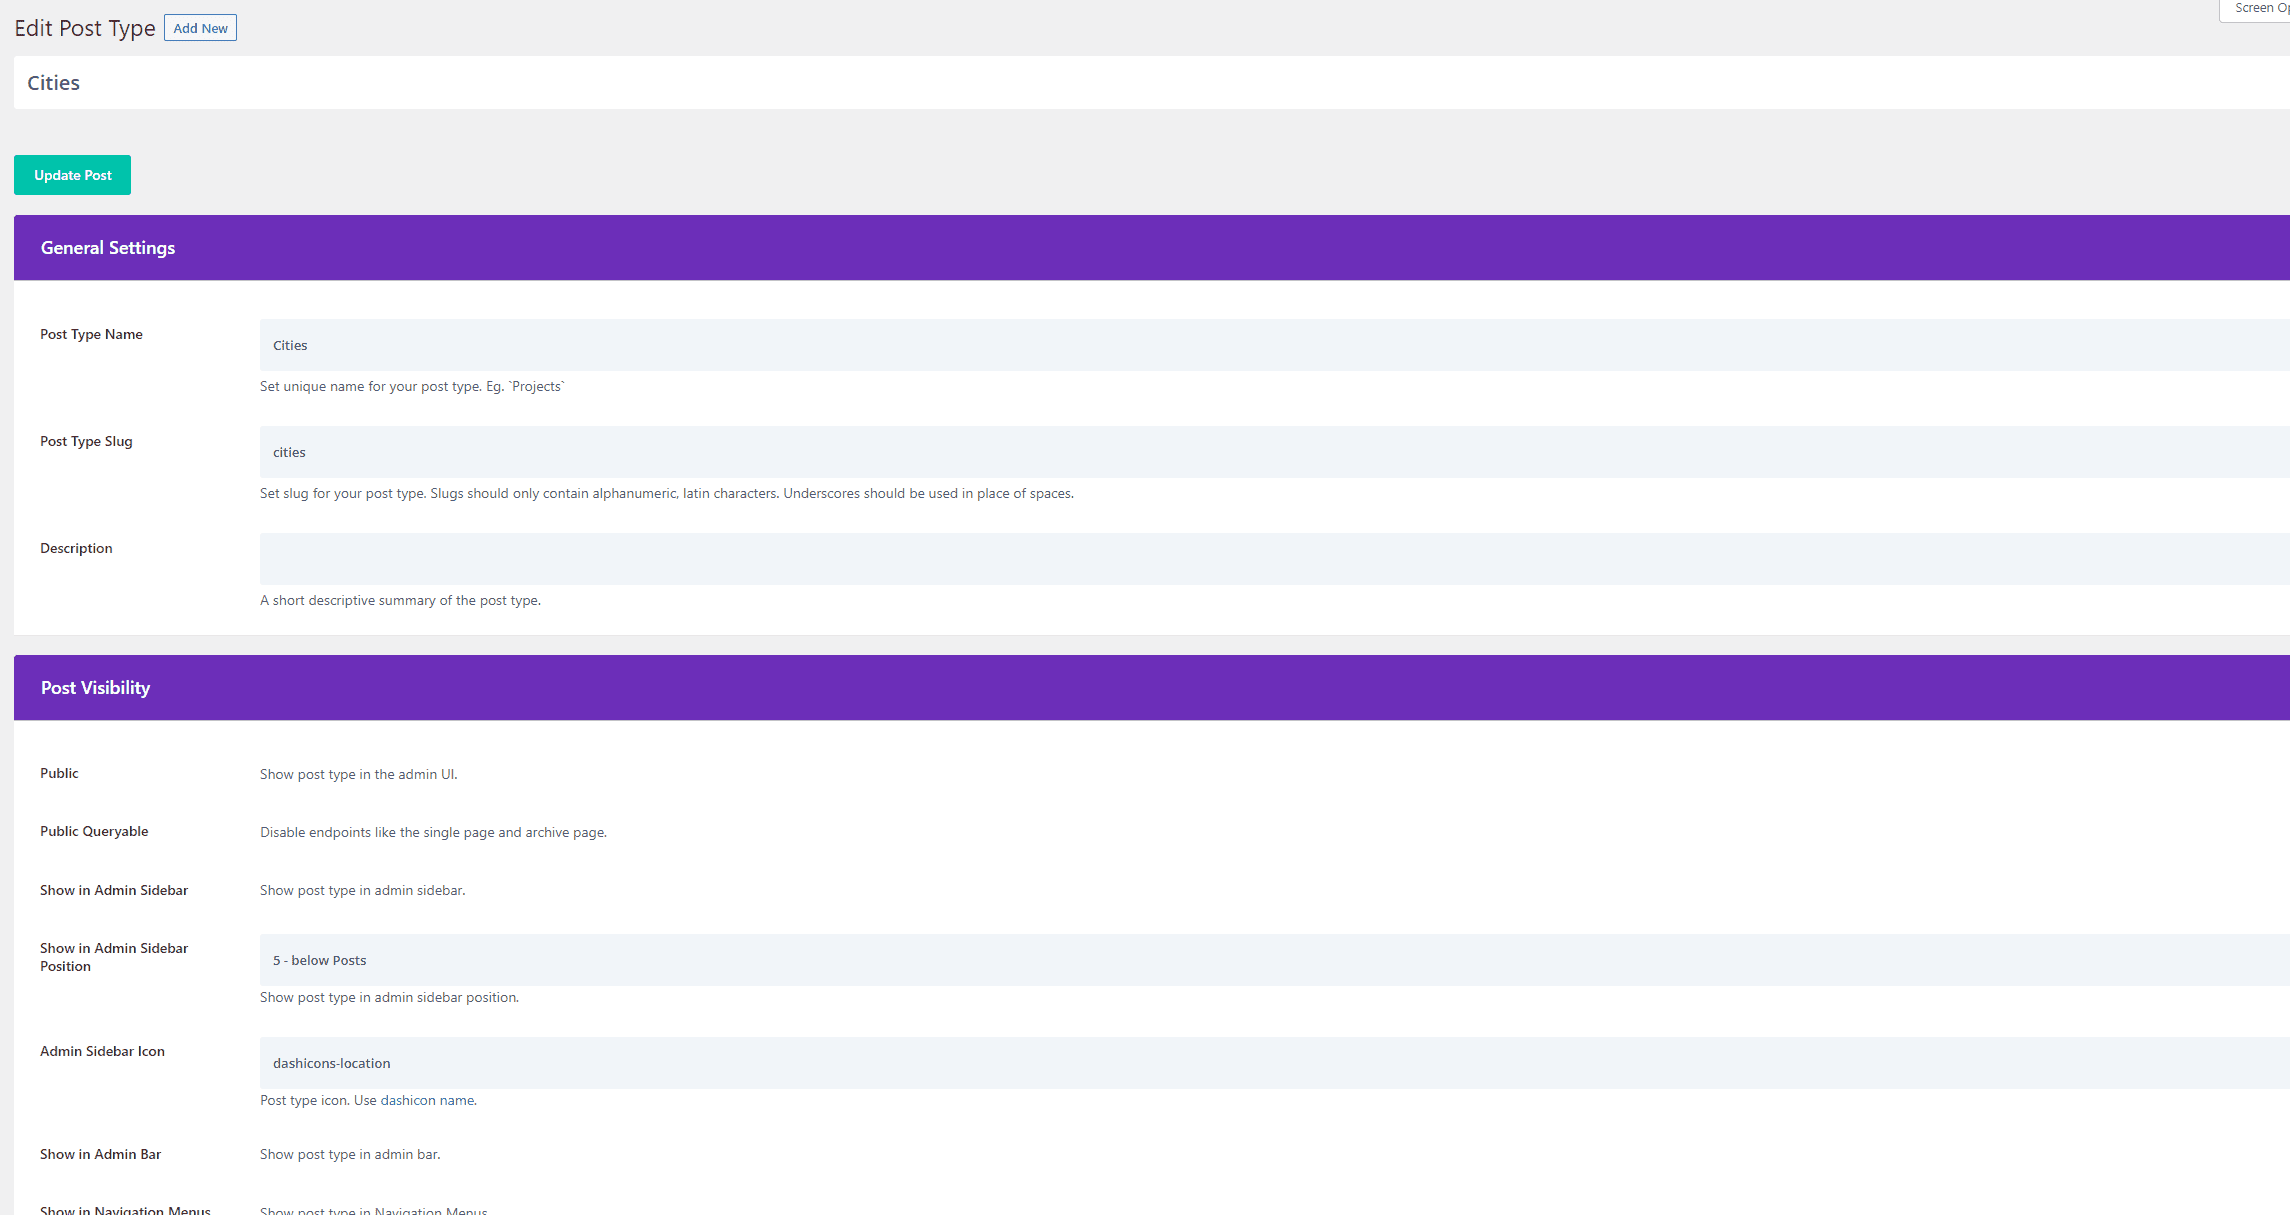
Most of the options are just preferences, but one thing I would suggest is to set the “Enable Archives” option to “Yes (use default slug)”. That way, our URLs have the slug prepended to them and look something like “/cities/<city name>/”.
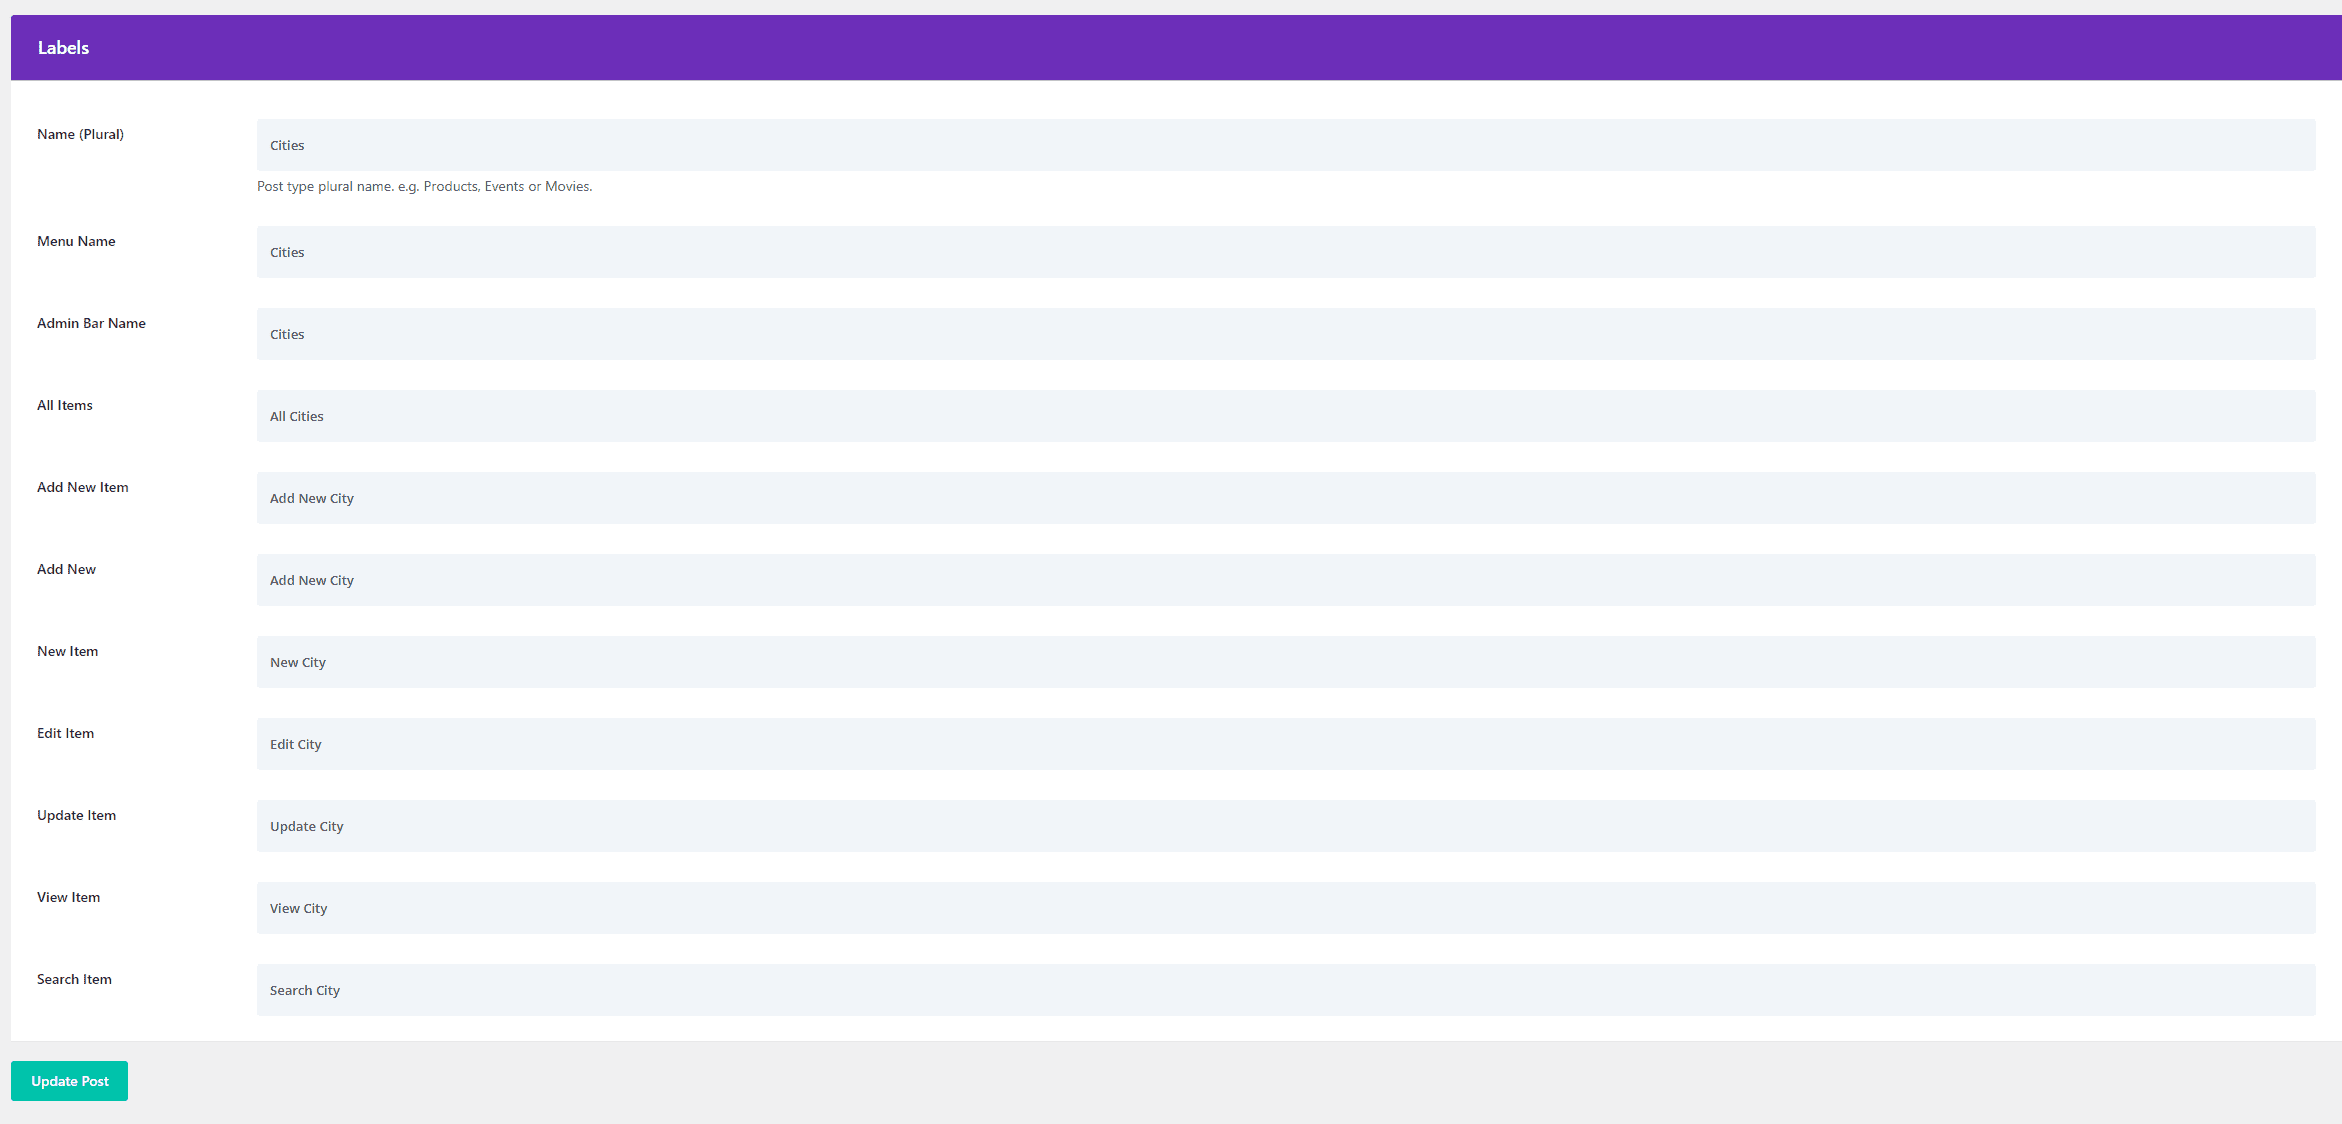
One last minor thing to do is go to the “Labels” section and ensure we spell our labels correctly since many of the singular titles will be populated with the plural spelling and need to be corrected to “City”.
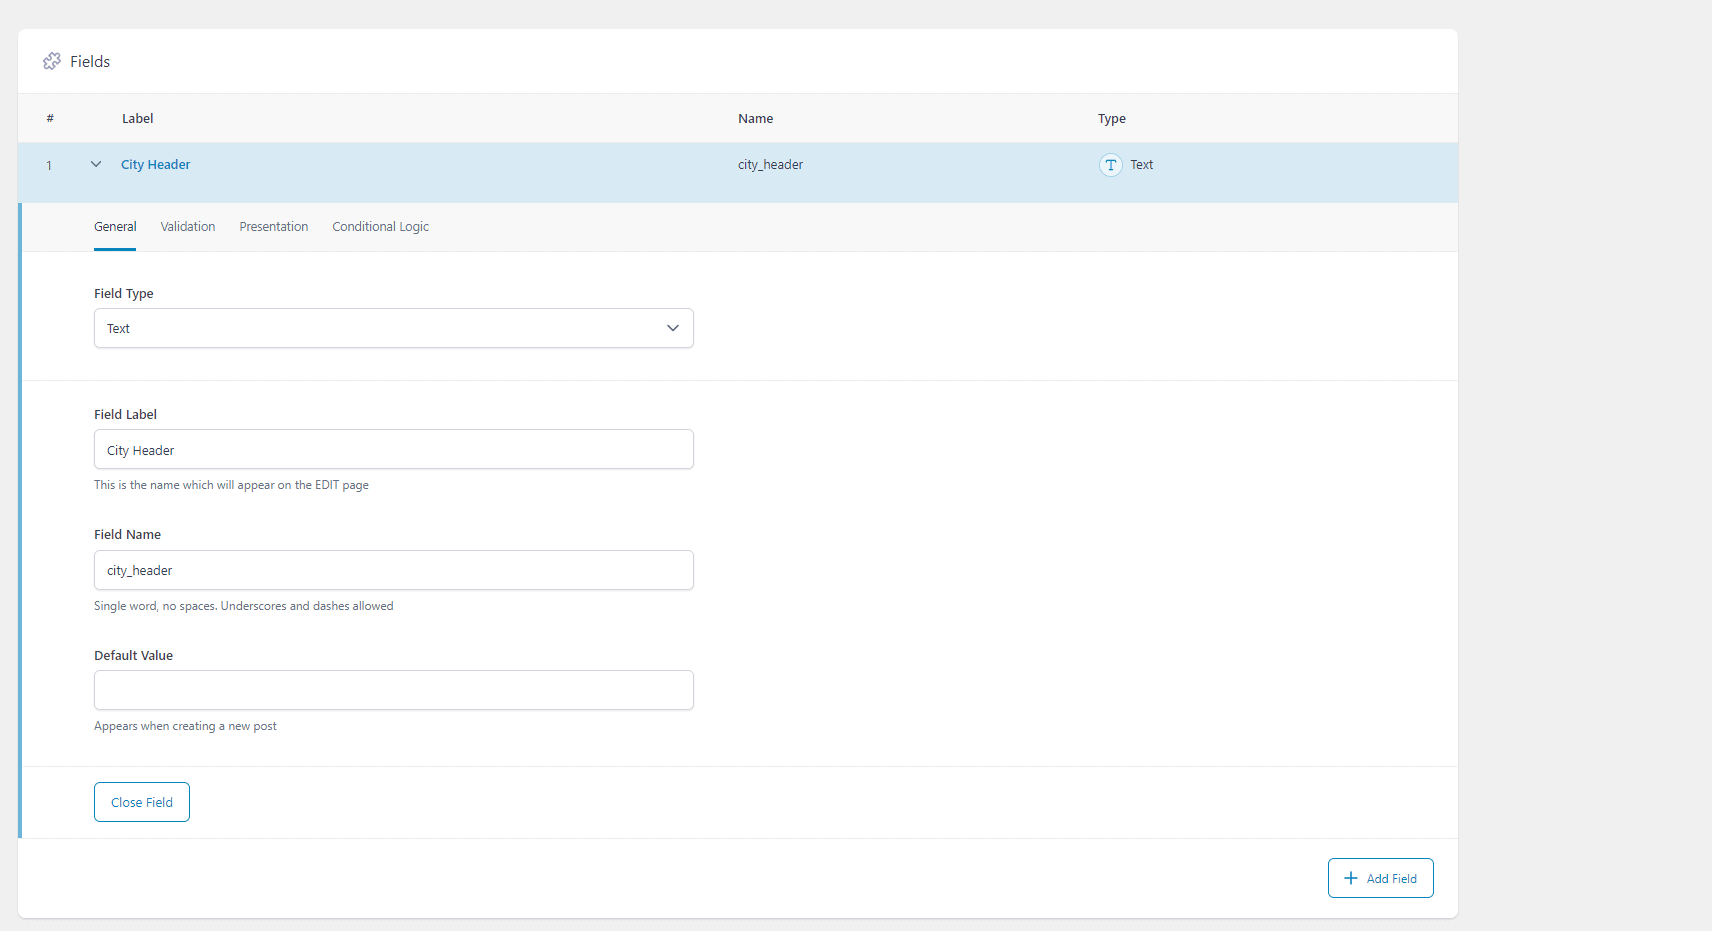
Add Custom Fields
We’ll need to add a custom field to display our H1 above our featured image and separate it from our main content. We’ll start by creating a field group for our Cities CPT.
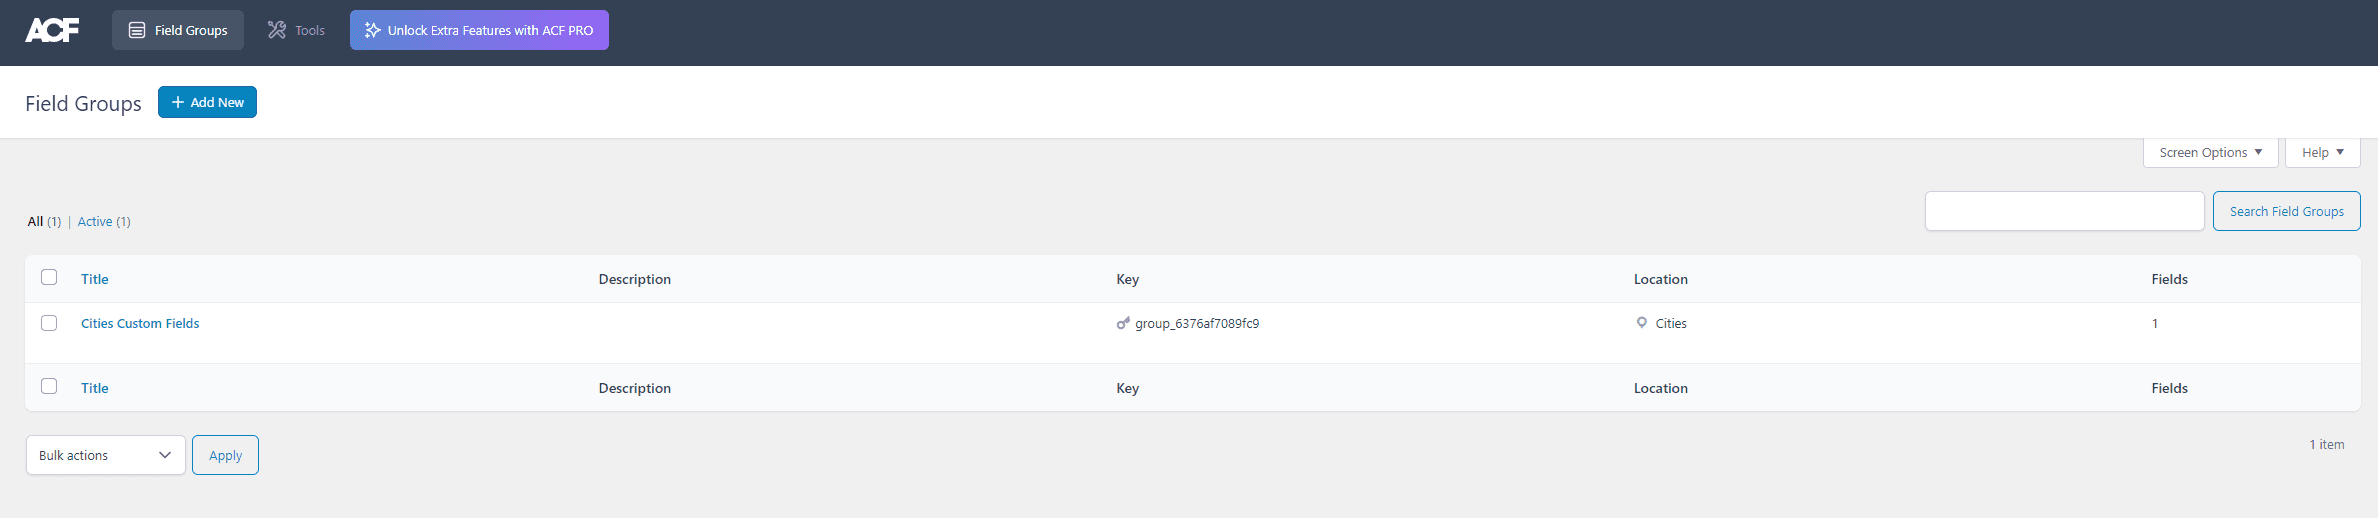
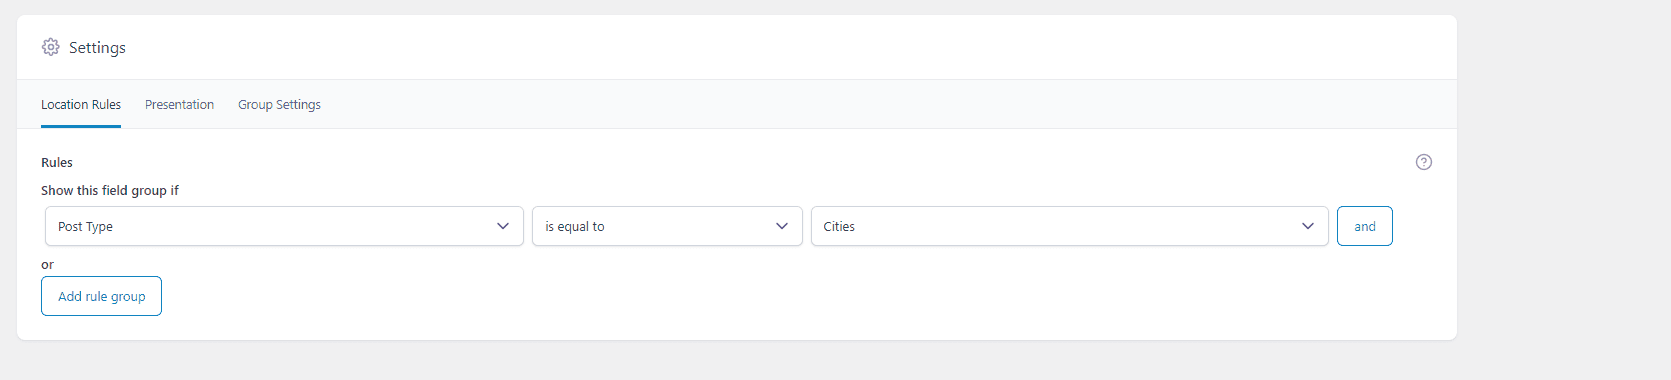
Once created, we can click “Edit” on our field group and add our field. We need one text field, which we will name “City Header”, but you can call it whatever you wish. Finally, make sure you set the Location rules for our field group so that the custom fields only show up when the “Post Type” -> “is equal to” -> “Cities”.
Add a “City” Theme Builder template
We’ll need to create a template to set how each City page will display on our site. To do that, we’ll use the Divi Theme Builder.
Navigate to the Theme Builder under the Divi sidebar menu on your site’s WordPress admin dashboard. Click on the “+” button to add a new template, and scroll down until you see the ” Cities ” section. Then, check the box next to “All Cities”.

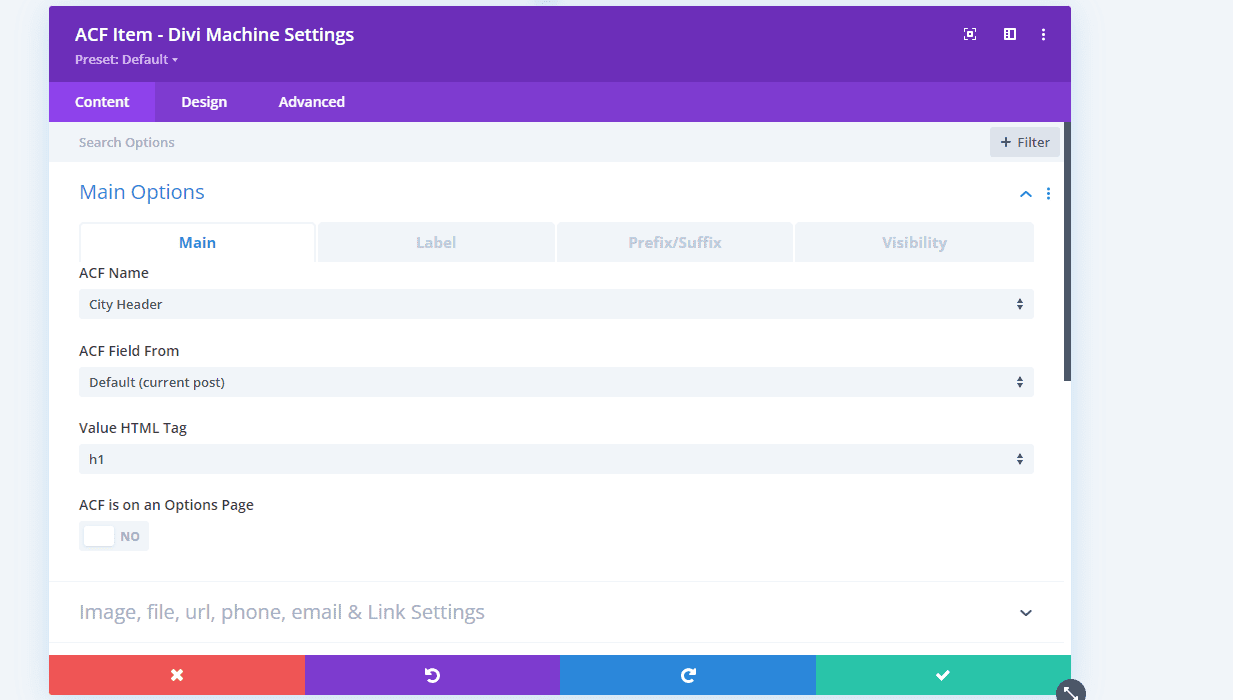
Next, create a custom body for the template. Usually, we start with a simple template, adding the featured image, post content, and our H1 custom field and including a contact button at the bottom.
Select the correct custom field in the ACF Item settings (it should show up in the dropdown) and set the HTML tag to “h1”.
Also, we add our featured images as a static image module within the template rather than use the featured image field on the cities themselves, making it easier to swap out the photos down the line if we choose to. However, if you want different images per city page, you’ll have to use the featured image field on the individual city pages.
Import our City Pages using WP All Import
The last step in our process is creating all the city posts.
To do this, we’ll create a CSV file with one column with the heading “city” populated with the names of all the cities we want to create pages for.

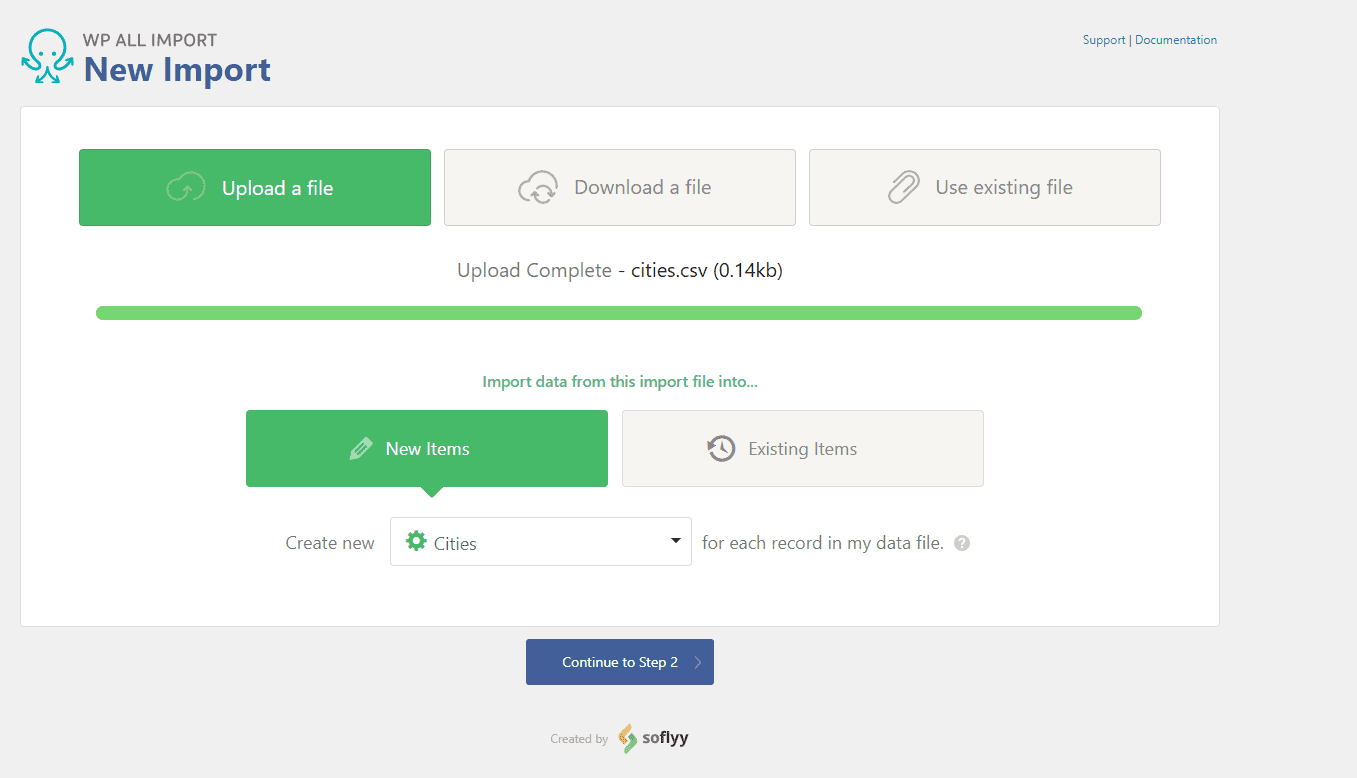
Now that we have the CSV file ready, we can go to the WP All Import settings and start the import. Navigate to “WP All Import” on the sidebar and then “New Import”. Next, we’ll click “Upload File, ” import our data into new City items and then move on to Step 2.
If everything looks good in Step 2 (it just shows you a review of the rows you’ll be importing), you can move on to Step 3, where we will import the content.
There are only three things we need to set up in this step: our city titles, city content, and the header custom field we added earlier.
For the title, we can use the city column from our CSV and drag it right into the title input.
To set up the content, we’ll paste the HTML we created earlier into a text editor like VS Code or Notepad++. Next, we’ll find and replace all of the instances of our city name with the tag that we used in WP All Import, which in our case, is {city[1]}. Once we’ve done that, we’ll copy the content from the text editor and then paste it into the content input in WP All Import.

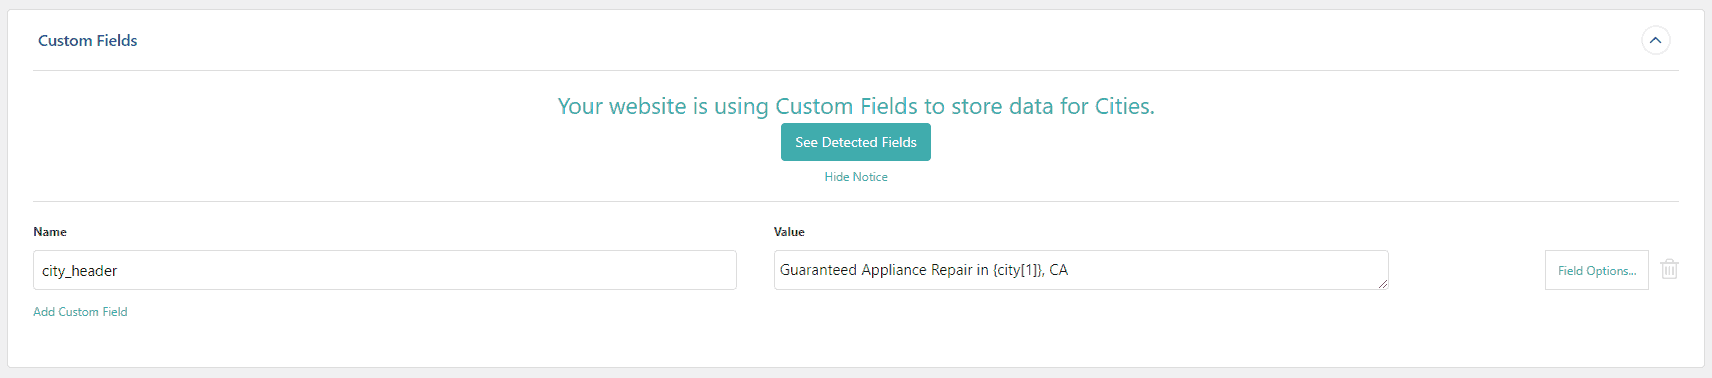
Lastly, we need to add the City Header custom field. We’ll do this by scrolling down to the “Custom Fields” section and adding the name, in this case, “city_header”, and the value. Add whatever text you like for the value, and include the city tag so that the city names are populated dynamically. For our cities, we’ve added the text “Guaranteed Appliance Repair in {city[1]}, CA”.
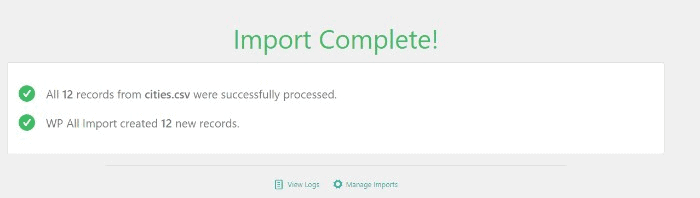
Moving on to Step 4, we can add the city name tag for the unique identifier and uncheck “Update existing cities with the data in this import file” since this is the first import. Now we can finally move to the last step and import our pages. Once that’s complete, we’ll be greeted with a screen letting us know the import was a success:
Let’s check out our new pages!
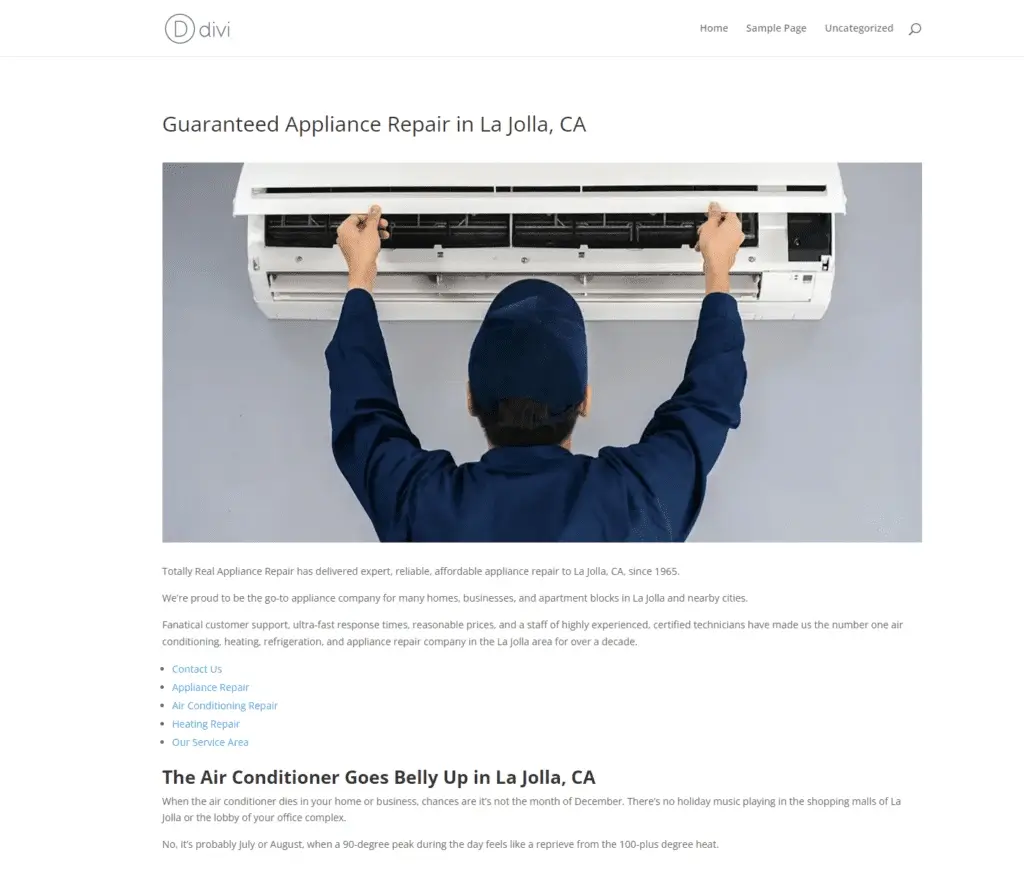
They may not be anything fancy, but we can always go back and add more styling or modules in our template to spice them up a bit more.
Conclusion
And with that, we’ve created 12 City Pages for our website! The process makes it easy to create a large number of pages in a short time.
One other thing that you’ll want to add is an archive (listing) for your city pages. I won’t go over the details in this post, but the Divi Theme Builder and Divi Machine Archive Loop module can help you build that. This article describes how to use the Archive Loop module.
If you have any questions or thoughts, let me know in the comments below!

Greg Lorenzen is the Senior Developer at Culture Cube Marketing and has been on the team since 2018. In his time at Culture Cube, he's created interactive apps for experiential activations, developed data integrations as well as created custom eCommerce solutions. He has extensive experience with WordPress, including plugin and theme development, and currently manages all of Culture Cube's web servers.
Although he holds a degree in music, he began to teach himself programming out of school and quickly developed a passion for all things software. This started him on the road of freelance web development before joining the Culture Cube team.
In his spare time, Greg enjoys writing and listening to music, playing guitar, reading, cooking, spending time with his wife and family, and myriad other things there isn't enough time in a day for.


